Results Submission Guide
NOTE: Multiple worksheets are NOT supported, also hidden fields in excel are NOT hidden when you upload results, please make sure when you upload results that there are no hidden fields.
Step 1
The first step in the process is to ensure that your results file is formatted correctly. The new system can take any of the previous 18 columns (Event Organization, Event Year, Event Permit, Event Date, Event Discipline, Race Category, Race Gender, Race Class, Race Age Group, Rider First Name, Rider Last Name, Rider Bib #, Rider License #, Rider Club/Team, Rider Time, Rider Place, Race Distance, Race Distance Type) that were available, and now as few as 5 columns (Race Discipline, Race Category, Rider First Name, Rider Last Name, Rider Place) can be uploaded to create results for your event. Please be aware that without a rider's license number in place we will be unable to rank them for the event. The preferred set up for a data file can be seen below with the various columns and data type examples that should fill those columns. Once your file is set up, make sure to save it as either a .CSV or .XLS file. The new uploader can currently only accept those 2 file types. For a full run down of all values that the system will accept please check out our Results Submission Cheat Sheet. You can also download an example by clicking here.
| Race Date | Race Discipline |
Race Category | Race Gender | Race Class | Race Age Group | Rider License # |
Rider First Name |
Rider Last Name |
Rider Place |
|---|---|---|---|---|---|---|---|---|---|
| 9/1/11 | RR | Cat 1/2 | Men | Master | 35+ | 123456 | John | Doe | 1 |
| 9/2/2011 | Criterium | Cat 5 | Women | Junior | 1-18 | USA19840130 | Jane | Doe | 2 |
| TT | Cat 1/2/3/4/5 | Both | Senior | 35-44 | DNP | ||||
| XC | Open | Mixed | Single Speed | DNS | |||||
| STXC | Cat 3/4 | Male | Clydesdale | DNF | |||||
| XCM | Female | A | DQ | ||||||
| STR | All | B | |||||||
| DH | M | Collegiate | |||||||
| Mountain Cross | F | ||||||||
| DS | W | ||||||||
| CCR | A | ||||||||
| Circuit Race | B |
Step 2
The next step in the process is to ensure that your account has permission to submit results to USA Cycling. If your permissions are set correctly, then under the "Tools" link on your "My USA Cycling" profile. Your "Tools" link should look something like below if your permissions are set up correctly. If you do not have your permissions set to allow you to submit results, contact ranking@usacycling.org with your name, license number, event name, event permit number and event date. We'll then set up those permissions for you. Please allow 3-4 business days for this process.
Step 3
Once your permissions have been set, you are ready to upload the file you created. In your "My USA Cycling" account under your "Special USA Cycling Tools," click on the "Submit Race Results" tool. Once on the results submission screen, you should see the results uploader, pictured below. Click on the browse button, this will open a browser window which will allow you to search and select a file from your computer. Locate and double click the file you'd like to submit to select it. The browser window should disappear and the chosen file name should appear in the results uploader box. Once you've chosen the file you'd like to submit, click the upload button.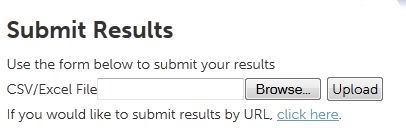
Step 4
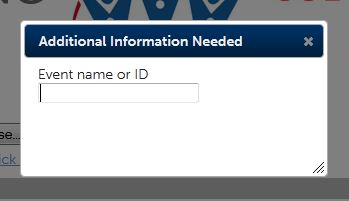
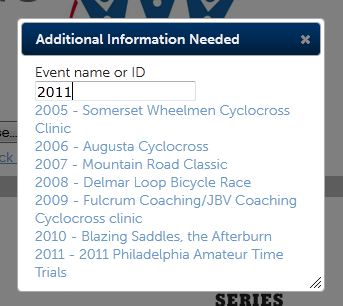
Once you click the upload button the system will start to process the file. If all of the information the system must have (Race Category, Rider First Name, Rider Last Name, Rider Place) is available in your file, and there are no mistakes, the submission will complete and you will get a successful message. If more information is needed or there are errors found in the file, a dialogue box will open asking you for the missing information regarding the results you just tried to upload. The first dialogue box, or the "Event ID" dialogue box, will ask which event you're trying to upload to, and will look like the picture below. You can either search by your "Event Name" or by the "Event ID" (if the permit number is 2011-XXXX, then XXXX is the event ID). As you enter in the event name or event ID, the system will display all events matching the search criteria. Once your event is shown below the search bar, click on it.
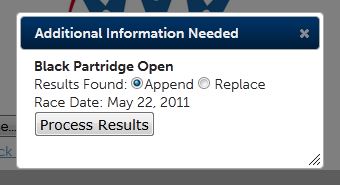
After the "Event ID" dialogue box, you may encounter the "Reconcilation" dialogue box. This box will pop up when you are submitting results to an event that already has results submitted for it, giving you the option to either append or replace the results already in the system. If you choose to append the results already in the system, then the existing results in the system will remain intact, and the file that you are uploading will be added to them. If you choose the replace option, the system will replace any existing results with the same date and discipline for that event with the file you're uploading. If you are appending results to a series permit, you'll also be able to choose any of the listed race dates to upload to in this screen. Once you've made your choice, click on "Process Results" button.
Step 5
At this point the system will process your results, looking for any errors that might be in the file you submitted. If no errors are found the in the results file you will receive a successful message and you can skip to Step 7. If any errors were detected in the file, the system will pop up the "Data Error" dialogue box. This means that as it was looking through your results it found some issues with the data that would cause your results not to be fully ranked. Some of those issues could be missing license numbers, license number and rider last name not matching or the system seeing that you have a class in your category field. The "Data Error" box gives you the opportunity to either edit the mistakes that might have occured or just submit the results, either correcting the data errors that it can, or giving the license number a zero in cases were the system can't rectify the data error. Most of the time you'll want to click the "Edit Results" button.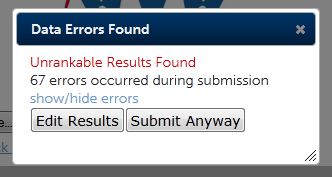
Step 6
If you click the "Edit Results" button, it will take you to the results edit screen, which highlights all of the mistakes in red. The editor groups race information allowing each race to have all results information edited in one location. For example, changing the Race Category will apply the change to all results listed under that race. This makes it easier to change information for multiple results. The new editor also allows for the submitter to create races and results for the those races without having to re-submit the file. Clicking “Add Race” in the upper right will cause the system to create a new race container. At this point you can click “Add Result” to create a result for this race. Modifying the race details (area in gray) will update all results that fall below it. The new editor also allows results to be dragged from their current race and placed under a new or different race. By clicking the blue up/down arrows at the left of each result you can move results between race containers. PLEASE NOTE that with large result sets, this drag action may be delayed depending on the speed of the computer and browser being used. This action will be faster on newer browsers because they have been optimized for this type of operation.
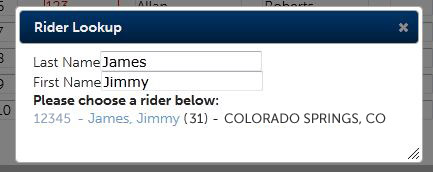
If you click on any of the license numbers highlighted in red, the "Rider Lookup" dialogue box will pop up, giving you the options of everyone that matches the name listed, their license numbers, race age and hometown. Click on the correct license number if it's listed and the system will populate that into the results. If the correct license number isn't listed just click on the exit "X" in the top right hand corner of the dialogue box to exit. Once you are done editing the results, click on the "Save Results" button in either the top or bottom left hand corner. If you feel like you need to dump all the results and start over from scratch you can click on the "Cancel" button to the left of the "Save Results" button.
Step 7
The system will let you know it's done processing your results. When completed you'll get the "Successfully Processed" dialogue box. At this point you can choose to either load more results or view the results you just uploaded.

This Article Updated May 22, 2013 @ 05:19 PM For more information contact: